


Have you ever dreamt of having a swimming pool in your backyard but thought it was out of reach? What if there was a way to install one without the hefty prices charged by pool companies? Saving a bundle of your hard-earned money and transforming your backyard into a personal oasis with DIY swimming pool kits is more popular than ever.
At Complete Fibreglass Pool Kits, we’ve helped heaps of customers across Australia install their dream pool. Take Sarah from Essendon in Melbourne. With our help and support, she turned her backyard into a stunning retreat and saved over $13,000. Like Sarah, you might be initially feeling uncertain or overwhelmed by the idea, but we're here to reassure you that it’s totally doable.
Whether you're curious about the process or ready to go, this article will guide you through each step, from planning and preparation to final installation. Building your own pool is not only possible but incredibly rewarding.
What a basic DIY Swimming Pool Kit Includes
Have you ever wondered what’s inside a DIY swimming pool kit? Think of it as opening a treasure chest, but instead of gold doubloons, you get the keys to your backyard paradise! These kits pack in everything you need to get started: Typically, this includes the pool shell, fittings, a filtration system, chemical starter pack, cleaning equipment, and detailed documentation. Pool kits should include everything you need to make the installation process as straightforward as possible. From our experience, we've found that anyone can do it; it's not that difficult.
Advantages of Choosing a DIY Swimming Pool Kit
Going DIY with your fibreglass pool is a game-changer. Not only do you save a ton of money compared to hiring the pros, but you also get to customise everything to fit your unique style and needs, including heating, automation, minerals, lights and more.
Plus, there's something incredibly satisfying about being able to say, "I built that!" It’s not just about saving money; it’s about the pride and joy you’ll feel once it’s done. Trust us, the effort you put in will be worth it every time you and the family take a dip in your incredible new pool.

Typical Pool Installation Stages
Stage 1: What Size Is Possible?
-
Access for Equipment: First things first—ensure you have enough room for the equipment (pump, filter, chlorinator etc.). Ideally, you’ll need a space about 2.5m long and 1m wide. If space is tight, 900mm wide can still work.
-
Mark Out Your Pool: Grab some builder’s string and start marking out your pool's size. It’s like sketching your dream pool right in your backyard—think of it as your masterpiece in the making, minus the art gallery.
-
Find Your In-Ground Services: Before you start digging, consult Before You Dig Australia. Knowing where those sewer, electrical, and water lines are hiding is essential to avoid any messy (and costly) accidents!
-
Chat with Council or a Building Certifier: Check with your local council or a building certifier regarding the minimum distance requirements from boundary fences, your house, and in-ground services. These regulations can seriously alter the size and placement of your pool.
Stage 2: Choose Your Pool Kit
-
Customised Pool Equipment: Your pool equipment should be tailored to your setup and usage. During the selection process, think about where your equipment will go, how many people will use the pool, and what the surroundings are like. Giving this some thought now will prevent ongoing maintenance issues and reduce your annual running costs.
-
Tailored Recommendations: A short phone consultation with your pool kit supplier will ensure your pool equipment works perfectly for your specific setup. Discuss factors like:
-
Equipment Location and Type: Ensures optimal water circulation and reduced power bills.
-
Number of Users: Determines the capacity of your equipment to keep the pool clean.
-
Environment: Considers local council regulations and maintenance needs.
-
Stage 3: Installation Options
-
Owner Builder Permit: If you're managing the installation yourself, you’ll need an Owner Builder permit. This lets you oversee the project and hire contractors as needed.
-
Local Licensed Installer: Alternatively, you could hire a pool installer for a more hands-off approach. This is more expensive than owner-building; however, if you are time-poor, this is a good fit for you.
-
A Bit of Both: If you want to save money as an Owner Builder but would like a hand with the technical parts of the installation (bedding, backfilling, levelling the pool, etc.), you can have an installer help with just this stage as a nice balance between time and cost.
Stage 4: Council Approval and Quotes
-
Engineering Details and Site Plan: Your DIY swimming pool kit should include the necessary engineering and compliance documents required for your council permit application.
-
Council Permit: Next up, you’ll need to submit your permit application to your local council or use a private certifier for faster approval. We can suggest certifiers to use. It might take a bit of time, but it’s all part of the process. Patience now means more enjoyment later!
-
Hiring Trades: If you are using a licensed local installer, they will arrange the necessary trades to install your pool. If you are an owner builder, the most common trades required for pool installations include:
-
Temporary Pool Fencing: Required while your pool is being installed.
-
Electrician: To install power points and to earth your concrete bond beam.
-
Plumber: To connect a waste line from your filter to the sewer.
-
Excavator: To dig the hole for your pool.
-
Crane Hire: To lift the pool shell into place.
-
Concreter: To install your bond beam.
-
Pool Fencing Supplier: To install compliant pool fencing after installation.
-
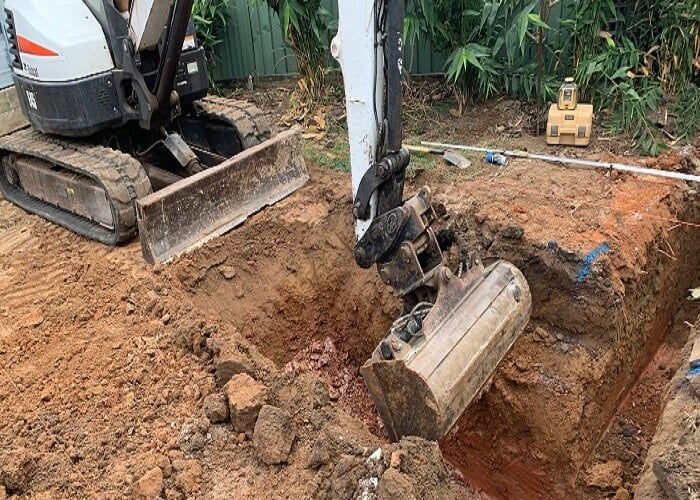
Stage 5: Excavation
-
Excavation Process: This is the prepping the canvas for your pool masterpiece stage. Your DIY swimming pool kit supplier should provide detailed dimensions for excavation. Hire an excavator to dig the hole and a bobcat to remove the soil. Ensure soil removal is included in the price—check out sites like www.fillwanted.com.au for free removal options.
-
Timing: Avoid digging more than a week before your planned installation date. If you get heavy rain or have unstable soil, you may end up with an excavator onsite a second time before you can lay the bedding. It’s the same feeling you had as a kid when you just finished an epic sandcastle, and a wave washed it away. This time, you’re the one in charge of the tides!
Stage 6: Bedding
- Bedding Material: To ensure your pool is level and has adequate groundwater drainage, use a bedding layer of porous material like crusher dust or small aggregate stone. This layer doesn't need to be compacted, and you won't need a concrete slab. Your DIY pool kit should include the Australian Standards 1839:2021 for fibreglass pool installation to guide you through the process.
Stage 7: Pool Shell Delivery
- Delivery and Placement: It’s an exciting day when the shell arrives—it’s like Christmas morning, but instead of toys, you’re getting a giant fibreglass bathtub! Your pool kit supplier will usually deliver the pool shell and unload it safely on your property. You or your installer will need to organise a crane to place the pool shell into the excavated hole. If there are obstacles like power lines or a two-story house, a larger crane might be necessary.
Stage 8: Plumbing and Connections
- Plumbing Setup: Connect the return jets, skimmer box, and other provisions with Class 9 PVC plumbing and two-part pressure glue. Usually, it is 50mm pipe from the skimmer box to the pump and 40mm pipe back to the pool. Make sure to pressure test all plumbing connections for leaks before backfilling. Install a 100mm PVC standpipe with a hydrostatic valve to manage groundwater levels. This step ensures everything flows smoothly, literally!
Stage 9: Backfill and Level
- Backfilling Process: Use cement-stabilized crusher dust to backfill around the pool. It is important not to rush filling the pool with water to ensure it remains level and the pool walls stay straight. Don't forget to install temporary pool fencing for safety.
Stage 10: Filtration
- Equipment: Once your pool is backfilled, it’s time to set up the equipment, including the pump, filter, and chlorinator. Think of it as your pool’s life support system—without it, you’ve just got a very large, fancy puddle. Your pool will still be grubby and not ready for swimming just yet, so use this time to thoroughly test your equipment is working properly. And yes, this is the perfect excuse to avoid any more heavy lifting for the day.
Stage 11: Concrete Bond Beam
- Bond Beam Installation: Lay a reinforced concrete beam around the pool to provide structural integrity and support for your coping pavers. This step is crucial to keep everything in place—think of it as the belt that keeps your pool's pants up. You’ll also need an electrician to earth the reinforcing steel in the bond beam. Because safety first, folks! While very unlikely, we don’t want any unplanned ‘light shows’ when you dive in.
Stage 12: Coping Pavers and Surrounds
- Coping Pavers: Once the bond beam sets, it's time to install coping pavers. These are the fancy edge of the pool pavers that make your pool look oh-so-fancy. If you are paving around your pool, you’ll save money by having your paver lay it all in one go. Plus, this is when you can start envisioning the final look. Start blowing up the pool toys and maybe even throw a mini celebration—you’re almost there!
Stage 13: Making Your Pool Safe
- Pool Fencing: Install compliant pool fencing to ensure safety and meet Australian Standards. Your fencing should be installed by a professional to guarantee compliance. Remember, nothing says “stay safe” like a good fence—and it keeps the neighbour’s dog from taking a dip in your new oasis.
Stage 14: Final Certification and Landscaping
- Certification and Landscaping: To get your pool’s official stamp of approval, arrange for final inspection and certification from your local council or private certifier. Landscaping can be completed at your leisure to enhance the pool area. This is where your creativity shines—go wild with plants, lights, and maybe even a flamingo float or two. Make your backyard a paradise worthy of a travel brochure!
Stage 15: “The Best Stage” Enjoying Your New Pool
Congratulations on taking the plunge (literally and figuratively) and building your own pool with a DIY swimming pool kit! Not only have you saved money, but you've also created a space uniquely tailored to your family's needs and tastes. The joy of cooling off during the hot Australian summers is just the beginning of the memories you'll create here. You've turned your backyard into a personal oasis, and the pride you feel is well-deserved.
We’d love to see your pool transformation! Share your success story with us and encourage others to take the DIY plunge with a DIY swimming pool kit. Visit our website for more DIY resources and pool accessories. If you have any questions or need further assistance, feel free to contact our team. Your pool-building journey doesn’t end here; it’s just the beginning of endless summer fun!
Additional Resources
- The Essentials You Must Know Before Buying a Pool
- DIY Pool Installation Guide - Check out this very detailed Step-by-step guide to installing your pool, it dives alot deeper into the ins and outs of it all.
- Questions? - Get in touch we’re happy to help answer any questions you may have.
Happy pool building!


